Friday, November 29, 2013

HOLIDAY KAZOO VIDEO UPDATE SCHEDULE

Each year right after Thanksgiving Day I have to suspend some of the video updates of my kazoos due to the large number of Christmas orders I receive each year.  And regretfully today is that day as I now have quite a few kazoos to make.  This way I can keep my sanity and ship all orders on time and most early.

So orders received today and until New Years Day will only have a final update video.  I will be posting lots of still pictures and narrative updates on the Facebook page.  It take nearly three hours to edit, render and upload each of the long second update videos and right now I have fourteen kazoos ordered.

https://www.facebook.com/pages/The-Great-AsWeGo-Kazoo-Factory/168109906556127

For the next few weeks my total focus has to be on making kazoos! :-)

Thanks for your understanding,
Merry Christmas
Doc Kazoo

Sunday, November 24, 2013

Special Edition Christmas 2013 Custom Convertible FatBoy Kazoo (Electric/Acoustic)

CUSTOM CONVERTIBLE FATBOY KAZOO
I am very happy to introduce this years Special Edition Christmas Kazoo.  The Convertible FatBoy Kazoo (Electric/Acoustic), serial number 001/2013. This kazoo is referred to as "Convertible" for two reasons. First it is designed to accept the commercial Hummbucker Kazoo Pickup and can be played either acoustic or electric. Second it is designed so that you can position the kazoo in a harmonica neck holder mounting either on the vent or mouth side of the resonator cap. It comes with two resonator caps. An electric cap that is designed to accept the Hummbucker Kazoo Pickup and a standard thinner acoustic resonator cap. With the electric resonator cap you can play either plugged in or unplugged. The electric resonator cap has a wee different sound than the thinner kazoo when played acoustic. The taller electric resonator cap adds somewhat of a bell effect on the sound. The Hummbucker Pickup will not fit the acoustic resonator cap.

In addition to this being a unique first of a new kazoo design it has an absolutely remarkable grain pattern and wood color.  It was sculpted by hand to provide a beautiful presentation of the grain and color in the same manner I create my Collector FatBoy Kazoos.

You can see and hear a demonstration of this beautiful kazoo on my YouTube Channel at:

http://youtu.be/q2_Hr3z5M5U

It is available now in my ArtFire Shop at:

http://www.artfire.com/modules.php?name=Shop&op=listing&product_id=7444265

Happy Kazooing to all!
Doc

NEW BARGAIN KAZOOS AT ARTFIRE


From time to time I will be in the process of smoothing in a kazoo when I discover a flaw or blemish in the wood that will not be removed in the smoothing in process. Most often this is a very small stress crack in the wood that is barely visible and has no effect whatsoever on the dynamics of the kazoo. The problem is completely cosmetic in nature. I call these "Grade B Kazoos" as opposed to my other kazoos which are "Grade A". All of my personal kazoos are "Grade B Kazoos".

Until last week never had I had more than one of the "Grade B" Kazoos at a time but I ended up with four! Two Dual Resonator Ultimate FatBoy Kazoos and Two Spirit Chaser Kazoo's that I just happened to rough in all from the same piece of woodstock. Well sure enough there was an almost identical hairline stress crack on each, in the same location on the kazoos that could not be removed in the final smoothing in.

These four "Grade B" Kazoos were just to danged pretty looking and great sounding to put on the shelf. So I decided to make a new kazoo category in my ArtFire Shop called "Bargain Kazoos" and make these beautiful kazoos available at a much reduced price. As I said I don't normally have these very often but in the future the one's I do have will be listed in the "Bargain Kazoos" Category/ Here's what I have there now.


http://www.artfire.com/ext/shop/studio/greataswegokazoofactory/1/7/372227//

Monday, November 18, 2013

DOC KAZOO DIY CANDLE HEATER


A few days ago I saw a video on making candle heaters and thought this would be a great idea for a small room off the workshop area approximately 60-70 sqft.  Plus not a bad idea to have around for an emergence winter power outage.  After doing a search and looking at various designs people have made I started looking around the workshop for things I could use to make one.    I am one of those people that have coffee cans full of old hardware. LOL  Plus I don't throw away anything that I might use for something at some point. LOL  My day use to say "keep it five years, if you don't use it then sell it or throw it away."  Trouble is I never remember when I got something so nothing gets thrown away! LOL

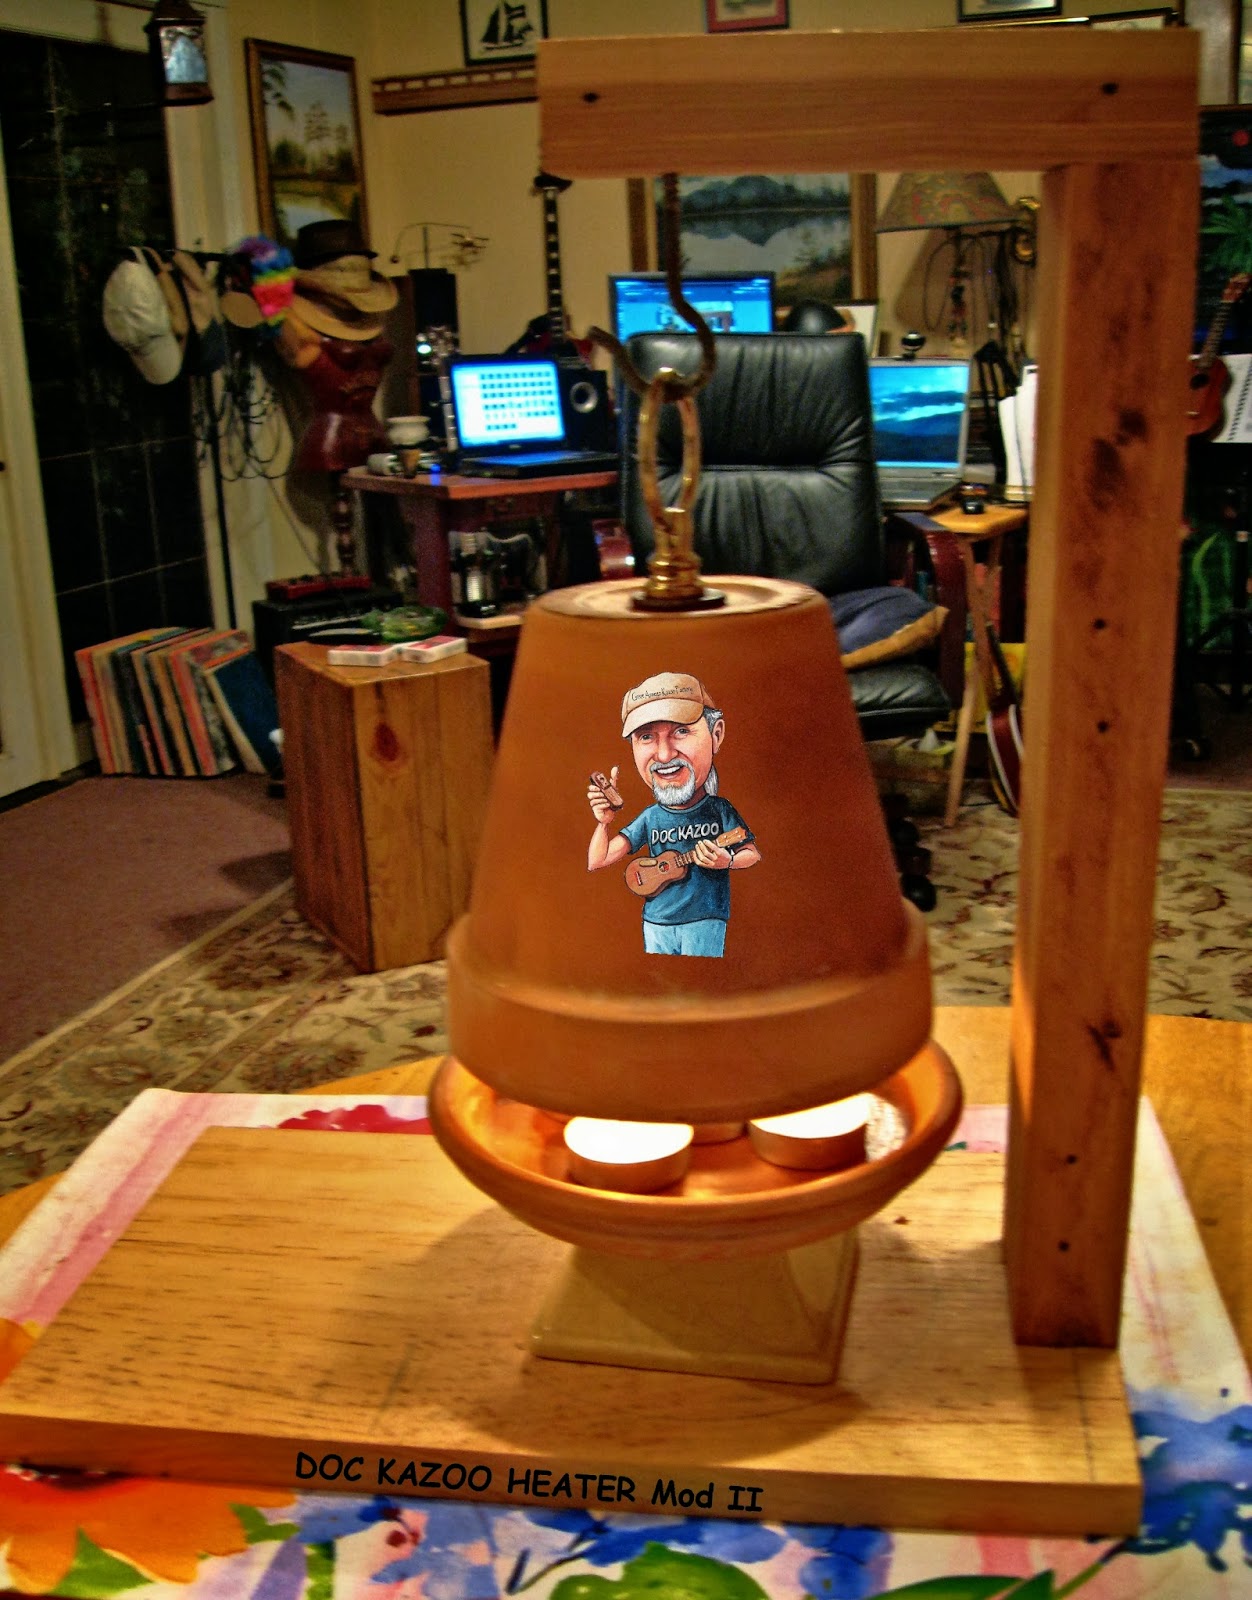
I have a bunch of flower pots sitting around so that part was easy.  I use four pots graduated in size outward to a 6" pot.  To connect the pots and make the hanging ring I used an old electric lamp finial, a long bolt with threads that matched the female threads on the lamp finial, a large washer between each pot and a porch swing style hook for hanging the assembled pots,  The pots can be adjusted up and down 3/4" by simply screwing the hanging hook in or out.

My candle heater stands 15" tall and the pine base measures 8"X14"X1".  The "yard arm" support for the hanging is made from 1 1/2"X2X1/2" recycled oak from an old shipping pallet.  The two "yard arm" pieces are assembled with wood glue and three 2 1/2" countersunk wood screws.  It is attached to the base with wood glue and three countersunk 1 1/2" wood screws.  It's a real simple design but sturdy design that can be assembled in an hour if you have all the parts.  One possible addition I may make to my candle heater is a heat reflector between the flower pot and the "yard arm" vertical support.

For the tea candle holder I used a 6" clay pot drip dish that I have epoxy'ed to a cheap candle stand.  It is not permanently mounted to the stand so that you can safely and easily move it in and out when hot to replace burned out candles.  To test the heater I used five cheap "dollar store"  tea lights.  They did fine except that the burn time was only about 90 minutes.  I will be ordering some better quality 4 hour tea lights I have found online for the heater.  After allowing the candle heater to warm up for an hour or so I checked the exterior temperature with a HVAC probe thermometer by holding it against the top at the mounting ring and bottom on the side 2" above the rim at the candles.   At the top the temperature registered 105F and bottom 125F.   First really cold day I will give it a real time test in the workshop room but I do believe this might just work there.

I am also thinking about one more addition to my candle heater with a metal reflector between the hanging pots and the yardarm vertical support.  I have some 12" wide bright aluminum flashing in the workshop that will work just fine.

This is definitely a real easy project that anybody could do and probably with stuff already around the house.  I can remember last winter loosing power for several hours on a cold winter day and had to fire up the Coleman Propane Lantern for heat.  We have a small bedroom that this will probably heat just fine based on what I have seen in videos where people are using them.   Definitely handy for emergencies.

Plus it's a lot of fun to make!

Happy and Warm Kazooing to All
Doc